Blog
Guide to Set up Jenkins on Local & Deploy Your First Spring Boot App

What is Jenkins?
Software development processes involving continuous integration and delivery (CI/CD) are greatly improved by Jenkins, an open-source automation server. Jenkins, which was first created as Hudson, has turned into a powerful and well-liked tool within the DevOps ecosystem. Its main objective is to automate software project development, testing, and deployment, providing a streamlined and effective development pipeline. It is especially effective at automating tedious operations, integrating well with version control systems such as Git, and offering developers a platform to work together in an organized and automated way. Thanks to its plugin extensibility and active community, Jenkins has grown to be a mainstay for companies looking to improve the quality, speed, and dependability of their software delivery processes.
Jenkins has become a key tool in the constantly evolving DevOps world, helping to streamline the pipeline for continuous integration and continuous deployment, or CI/CD. This blog provides a comprehensive how-to for installing Jenkins locally, setting it up for deployment, and launching your first Spring Boot application on AWS Elastic Beanstalk with ease. Source code management is ensured by the additional layer of efficiency provided by the integration with GitLab.
Guide to Set up Jenkins on Local & Deploy your first spring boot app
Prerequisites To Configure Jenkins on System (Ubuntu / Windows)
- Install Java 11,17 or 21 LTS on the system.
- Download Jenkins from: Offical Jenkins Page based on your OS.
- Once installed, run Jenkins on http://localhost:8080/ at its default port.
Basic Setup & Configuration for Jeniks to get started with deployment process
-
Set Java Home Path inside Jenkins Manage tools section as below:

-
Add Maven Installation for build purpose as below:

Add Important Plugins required for the deployment Process (Add further as per the requirement).
-
Go inside Plugins section as below & install the Mentioned plugins.

- AWSEB Deployment
- GitLab Plugin
- Github Plugin
Steps To Deploy Spring-boot App using Jenkins & Gitlab
-
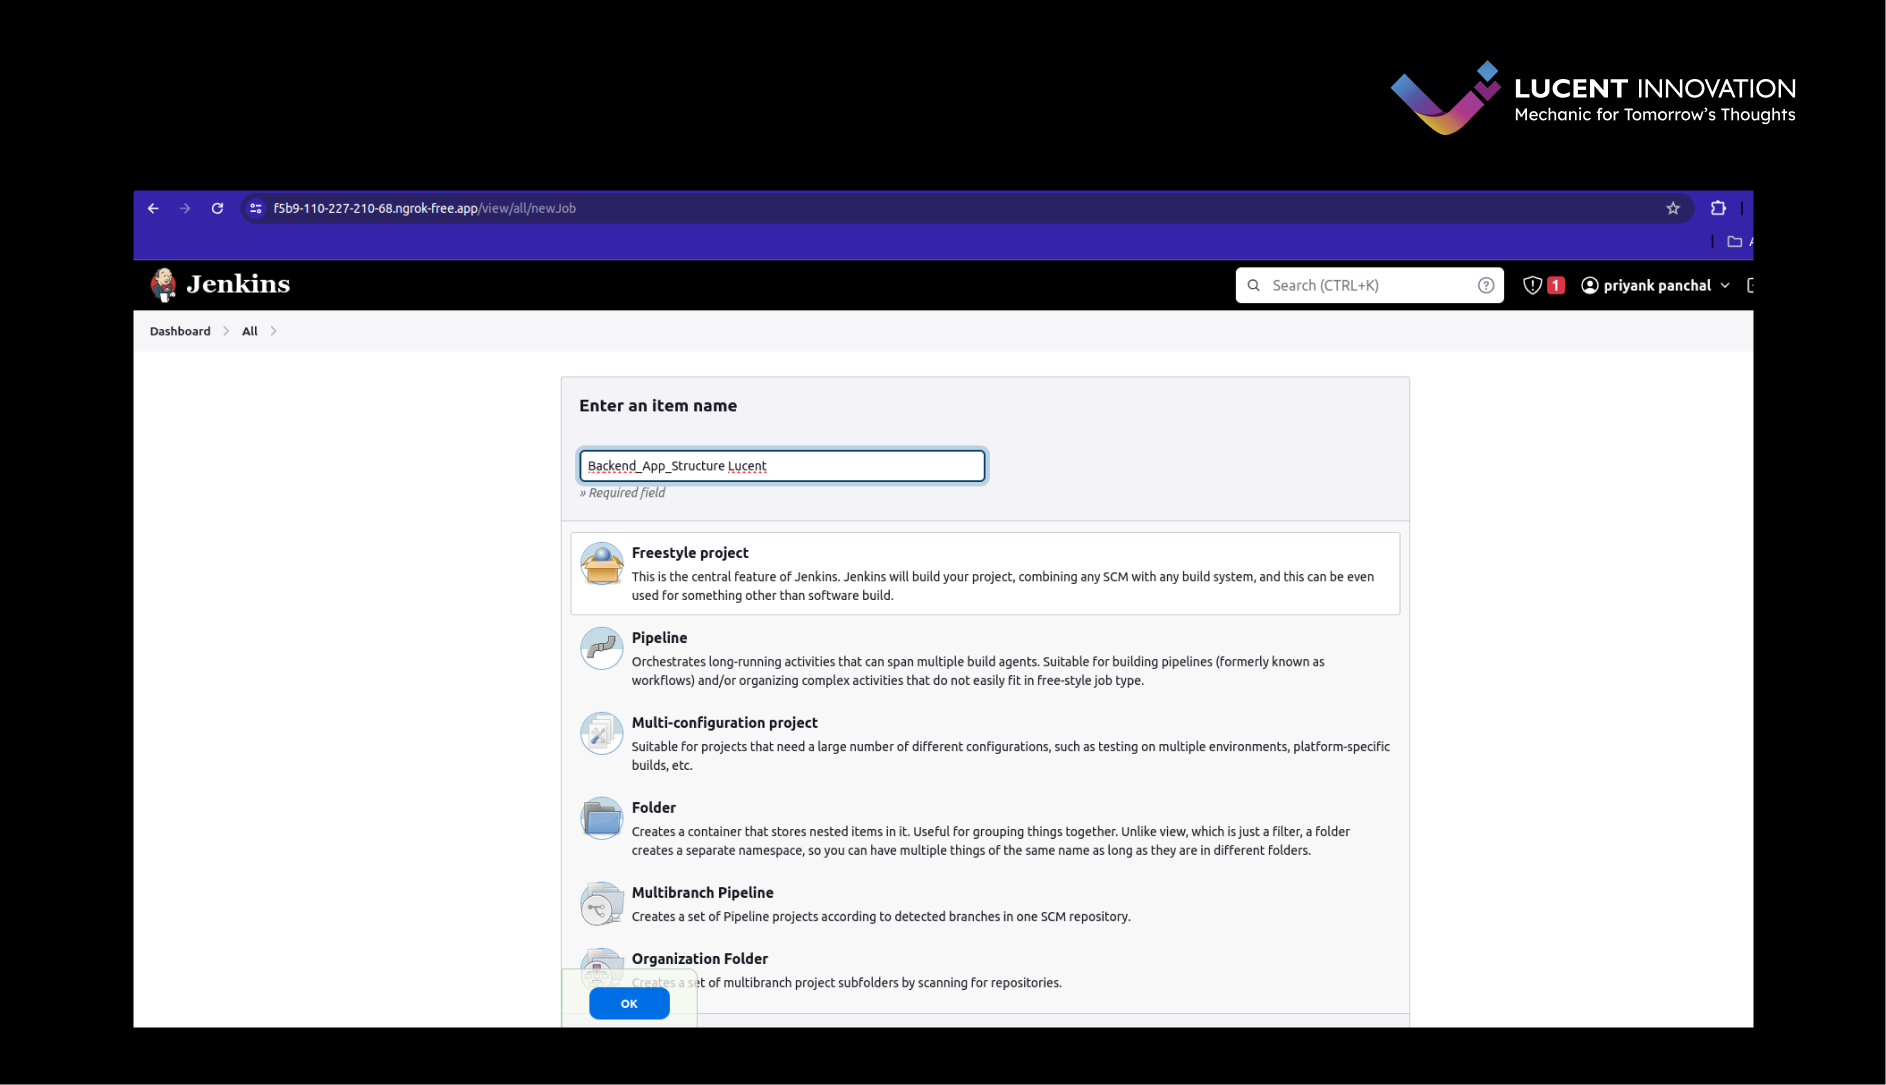
On Jenkins Dashboard click on New Item & create a free style project by giving an appropriate name of your project.
- Provide Description & Add Your Project Repository URL
- Then Move to Source Code Management

- Provide the Repository URL, branch name & (Gitlab or Github) personal access token (PAT) inside credentials section, so that Jenkins can access the private repository.
- Follow Create Personal Access Token tutorial to generate your PAT.

- In Previous slide credentials were already added, To add New one click on add button & below window will open.
- Here select username with password & provide username & password (token) to add it.

- Now, In the build steps section we need to provide the required build commands to execute as per our project requirements. (In add build step we have selected invoke top level maven target).
- Here we are providing maven version & its command as clean install, which will create a JAR file of that project inside the target directory.

Steps to configure AWS Elastic Beanstalk configuration
-
Now we need to add one more build step as AWS Elastic Beanstalk as shown below & need to configure it with all the required details.

- First step is to add the AWS credentials as shown below.
- Provide with the appropriate Access Key ID & Secret Access Key.

- Once you have added the credentials it will show as below.
- Now we need to provide AWS region, Application & Environment names which are to be used in AWS for deployment for the App.

- Inside Packaging specify the directory where our JAR is created, along with the s3 bucket name & s3 key prefix in uploading section.
- This bucket will have all the JAR's which are uploaded.

- At last, specify Version Label Format & Description of it as shown below.
- Apply & save all the changes.

- Once the build steps are completed, we can also specify post build actions if required.
- Here we have configured the email notification, once the deployment is successful, it will notify on the added emails. click on Apply & Save the changes.

-
Now, it's time to test the whole process, so click on the build now button as shown below, it will start executing the process. here we can also see the build history, to check the console.

-
Select the most recent build which you created & click on console to check the logs & execution of the same. It is shown as below:


- We have just added a TestController in our spring boot App with one GET API to test the deployment as shown below.

- After successful deployment when we try to fetch the data using that API it returns the result as shown below.

Conclusion
As we finish this extensive guide, you will have the knowledge to use Jenkins to efficiently coordinate your continuous integration and distribution processes. From setting up the foundation with necessary configurations and plugins to smoothly launching Spring Boot apps on AWS Elastic Beanstalk, you now have the skills to handle Jenkins' complex environment. The additional references given provide new directions for investigation and debugging. Accept Jenkins as a DevOps ally, which will enable you to deliver software with accuracy and speed. Happy coding!
Additional Links & References which helped us in deployment through Jenkins
Configure Jenkins and understand basic workflow from this video playlist
If you want to trigger a build in jenkins automatically every time when there is a new commit in our specific branch follow this tutorial
If you want to deploy AWS Lambda function using Jenkins follow this tutorial & blogs.
- How to deploy Github Code to AWS Lambda using Jenkins
- AWS Lambda and Jenkins Integration | Sandro Cirulli
- Deploy AWS Lambda Functions using Jenkins | Devops Junction
Also, read: Spring Boot vs. Spring Framework: Which should you use?
Found this post insightful? Don’t forget to share it with your network!
SHARE

One-stop solution for next-gen tech.